We’re back again with another project to celebrate Cricut’s wedding month! Cricut introduced me to their machines last month and I have been hooked ever since playing with the functionality that used to frustrate me so much doing it manually (a patient crafter I am not)! We’ve been working with Cricut to create two fun wedding tutorials (see our Cork Foil Shadowbox Tutorial here)!) to show you just some of the ways you can use Cricut for your wedding. As they say at Cricut “It’s Your Story, Make It Personal”.
The Cricut can cut over 40 materials, which means your wedding craft idea list just got so much easier and for this project, I chose frosted window cling. Which I love, because not only does it look as if I did all the hard work of rubbing etching cream into the mirror, but it’s also easy to remove so you can repurpose your mirrors after your wedding (though – fun fact – I’ve kept that beautiful quote mirror sign because I love it). We’ve even created two free downloads for you to load directly to Design Space and recreate the signs yourself!.
Follow along with our step-by-step tutorial to create these etched mirror signs yourself!
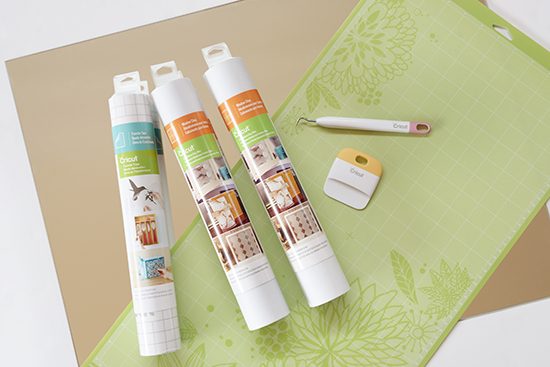
Supplies
1. A mirror
2. Cricut Machine
3. Cricut 12×24 Cutting Mat
4. Cricut Window Cling in Frosted White
5. Cricut Transfer Tape
6. Cricut tools
7. Polka Dot Wedding free downloads (Wedding Welcome Sign and I Love Her Quote)
1. Customise Your Design
We worked with Gigi & Lulu to create two gorgeous wedding designs for your signs that you can customize yourself! We created two free downloads for you- one has one of our favourite literary quotes the other? A wedding sign you can add your own names and wedding date to for your own big day! Get them (Wedding Welcome Sign and I Love Her Quote)
Upload your chosen file into Design Space and size as per your needs for your sign. You can use this free download on anything- from vinyl to paper!
For our wedding welcome sign, we left blank spaces for you to insert your own text (we used the font Arial on our final design). So simply type in your names and wedding date and you’re all set! Our gorgeous decorative font is Madina.
For our 450 x 600 mm mirror, we sized each word to about 16 inches wide.
Slicing designs to use on larger pieces is really easy in Cricut Design Space. First turn your image vertically, and then insert a rectangle behind the piece you want to separate, click “Slice” and delete your rectangle. Now you can cut your pieces to size!
2. Cut & weed
If you are using a large mirror like I did, make sure you get yourself a Cricut 12×24 inch-cutting mat so it can cut the larger design. Cut your window cling to size and smooth onto your cutting mat with the scraper tool.
Load it into your machine, make sure you set your dial to “Custom” and then select “Window Cling. Hit ‘cut’ and wait for the magic to happen!
Once you’re all cut, unload your mat and start to weed. The window cling is quite different to weed compared to vinyl because it clings with static – not adhesive. But take your time with your weeding tool, and utilize the spatula if you need to push the design back down, and you’ll soon have your design ready to go.
3. Apply transfer tape
Window cling is awesome for glass and windows because if you reverse your cut, you can use the backing as your transfer tape. But because we’re working with a mirror, we cut our own transfer tape to size.
Smooth your letters down in place before you work with your transfer tape, and then apply. Then burnish with your scraper tool.
4. Apply the design to your mirror
Placing your design on your mirror is probably the hardest part of the project so be sure to use a measuring tape and ruler to align it perfectly!
As we worked in sections, it was easier to lay the pieces on top of the mirror to get the placement right before we removed the transfer tape.
Carefully remove your transfer tape and place it sticky side down on your mirror, working with the scraper tool, start to burnish the design onto the mirror. If pieces start to stick to the transfer tape and don’t remove, gently move them with the weeder.
The best part about window cling is that if something doesn’t transfer properly, you can burnish it again and it will stick. The window cling turns a lighter colour when it’s fully adhered to your surface so your final step is to burnish over each letter with the scraper gently to ensure it’s stuck down.
And then what’s next? It’s time to enjoy your gorgeous new mirror – no one will know you didn’t etch it yourself!
Head on over to Cricut’s blog for this week’s contest! This week our American & Canadian friends can win up to $1500 of fresh flowers for their wedding day from FiftyFlowers (but Aussies, don’t stress – entry for all other prizes is open worldwide!). FiftyFlowers deliver wholesale fresh cut flowers all throughout the USA and Canada so you can create your own beautiful floral arrangements. Click here to enter!
This post is part of our paid partnership with Cricut. Thank you Cricut for delivering us this fabulous machine and giving us the tools we need to create fabulous wedding projects!






Gorgeous!!
Thanks Jessica!
Obsessed with the faux etching material! It’s so versatile and elegant!
It looks so much like I actually etched it- blows my mind!
For some reason, I can’t get the Welcome one upload into Design space. It says the image is unsupported. I don’t have any problem downloading the other one! I really need this file!
Hi Britton
I will look into this and get back to you!
Hi Britton,
All fixed! http://www.polkadotbride.com/wp-content/uploads/2016/09/Polka-Dot-Bride-Etched-Mirror-Welcome-Sign.svg_.zip
Let me know if that works for you (and be sure to send us a picture of the finished project!)
YESSSS! Thank you!
Made this for my daughter’s wedding recently. It looked beautiful!! While I struggled with directions a little since I was new to my machine, I figured it out eventually. It was perfect! Thanks so much for the files and tutorial!