I made these for my wedding this past August in Brooklyn, NY. These include over 160 hand-made cloth books which were mailed in boxes as invitations, a retro save-the-date postcard featuring self-timed photographs, surprise tissue programs, a hand painted ketubah, and more. I designed each piece myself and assembled everything with the help of my now, husband Eddie as well as other family members.

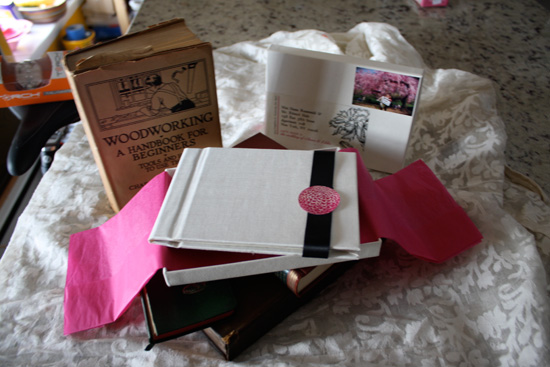
Each invitation consists of a hardbound book, with a white book cloth exterior, magenta flocked interior and milkweed speckled cover stock. Each of the 160 books was completely made by hand, including the design, printing, and binding. My husband and I trimmed all of the papers and book boards and adhered them with PVA glue. After we finished making the shells (an effort that took around 4.5 months), we adhered the interior pages.
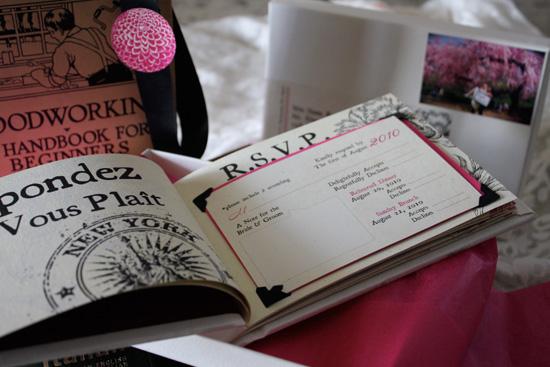
The RSVP page had a fuchsia envelope, custom card with a thought bubble for writing the bride and groom a note, and a handcrafted label. It was enclosed with 4 black photo corners. When removed from the book, there was a surprise message to be found on the page. For directions, I adhered a black half moon enclosure with a folded parchment map inside. A simple “Pull Me” instructed guests to pull out the paper to see the hand illustrated map.
The imagery inside the book was inspired by old Victorian botanic encyclopedias. As the wedding was at the Brooklyn Botanic Garden, I wanted the design to reflect the illustrations. The final page has a silhouette of the bride, groom and their dog Chum Chum. The books were tied with a black silk ribbon and of course handmade stickers of an old Dahlia that was designed to match the books’ colors: black, fuchsia and the cream of the paper. The book was placed in a cream box with fuchsia tissue paper, then wrapped in brown paper and another custom label. Even the stamp was custom made–a photo of us at the Brooklyn Botanic Garden in front of the Cherry Blossom Trees in full bloom, holding a sign that said “Look Inside.”
For our Save the Date we shot 3 photos to give our vertical jumbo postcard an ‘old time’ feel. In each photo we held real signs with Victorian style type. The first photo was taken at Coney Island in Brooklyn. The second on the Brooklyn Bridge (Chum Chum is in the basket!) and the third is on a row boat at the Central Park boathouse. The website was designed to match the Save-the-Date and printed invitation. In addition, when it came time to send out thank you notes, we mailed out cards with the same sign, this time saying “Grazie” as we honeymooned in Florence, Italy.
Other pieces included flower pot favors that also acted as seating cards, table number cards (all having different antique flower illustrations), a hand painted ketubah, hand-trimmed and designed circular menus, and ceremony programs–each program had a different cover and in the inside there was a small pink envelope that enclosed an “H” monogrammed tissue for “happy tears.” In addition all of the materials for gift bags were designed and handmade. My mother decorated all of the yarmulkes by hand.
I created a PDF book to show how I made the invitations (click each image to enlarge)
Ms Polka Dot says: We were blown away when Shana sent this to us! The thought and planning, the care and the effort that went into creating just the right feel for these invitations, thank you cards and everything in between, is just astounding in its creativity. Click on the images, pour over them and enjoy them as we did! Thank you so much Shana for sending them to us and congratulations on your wedding to Eddie!







So clever xx
Beautiful! I am wondering what something like this would cost? And was postage high?
Hi Marti,
I made these in the U.S., so I am not sure what the currecy conversion would be. I think when all was said and done it was about $3,000. I purchased book boards, glue and brushes from a local bookmaking store in Brooklyn, NY. All of the fabrics for the inside and exterior of the book I got at paper source. The boxes I also purchased at papersource.com
The ribbon and tissue paper I purchased online as well. The paper I got from a local paper store in NY called Paper Presentation. I believe it was called Milkweed and was a coverstock. I designed myself and printed myself as well as trimmed and scored everything which saved on that end. I had my mom and mother-in-law help assemble everything which took a whole day. Let me know if I can help you with anything else.
Hi Elaine,
I designed each page, and printed them all out one at a time. Kind of a time consuming process but well worth the results!
Shana, You did an amazing job on your wedding invitations! Did you design each page, then print up all the pages from the original one or hand make each one?
Thanks, I designed each page and then printed them all at once.
Hi Shana!
would you be able to explain your process for book binding? I see how you used the book boards and covered them in the paper, but how did you then bind the book at the end?
p.s these are Ammmmmaaazzing!
Hi Cyndall,
After printing and trimming the sheets in the inside, I stapled the pages together, pasted the outer rim with book glue and placed it against the spine. I then weighed the books down heavy art books, and crossed my fingers that they would stay put! And they did! Book glue is truly a magical thing. Let me know if you have any other questions!
:: shana
ahh I see, It looked so much more complicated than that, isnt it wonderful when things work the first time?!
you wouldnt happen to have a template at all for this? or could you tell me which program you used?
thanks for you’re help!
Cyndall
I didn’t use a template for the actual design…I designed it using a combination of Adobe InDesign and Illustrator and also scanned old botanical illustrations. As far as the book itself goes, my husband created the template to cut out the book board and fabric. It makes it a lot easier to have a template other wise you’ll have to remeasure each time you are trimming.
Hi there.
I LOVE this idea and will definitely be adapting it for my own wedding! Amazing work! Two questions: 1. Did you just glue the spine of the stapled sheets between the two slices of the book board? I’m confused how it’s staying put. Really looks wonderful. 2. What did you use the cardboard tubes for?
Thanks so much for sharing!!!
Hi Megan,
Yes, to answer your questions, I stapled the pages together, than used book glue to adhere the spine to the book shell. Then I basically weighed them down with heavy books. Took a bit of trial and error, but it ended up working very well and was pretty easy to execute. Happy to answer any other questions, good luck!
-Shana